Learning how to approach a junction can be one of the more intimidating aspects of learning to drive, but it doesn’t have to be. If you’re properly prepared and you’re comfortable in your driving lessons, tackling junctions is safe and easy.
Types of junctions
Learning to drive would be much easier if there was just one type of junction, but sadly that’s not the case. There are several distinct types of junctions with different road conditions adding even more variation. There’s a general gist to approaching junctions, but it’s best to understand the subtle differences between junction types before you take your driving test; you don’t want to have to work it out with your examiner in the car!
Unmarked junctions
If you do a lot of driving on rural or general quiet roads, you’ll probably be familiar with the unmarked junction. They’re usually quite small, have no stop/give way sign and no helpful road markings whatsoever. Unmarked junctions are popular with examiners as they really test your control skills and how you deal with other road users.
Marked junctions
Marked junctions are the more civilised cousins of the unmarked junction. They have give way or stop signs, are generally larger than unmarked junctions and, thankfully, have stop lines and other road markings. It’s almost certain that you’ll tackle a marked junction if there’s one on your test route.
Controlled junctions
Always featuring traffic lights to control traffic and generally including a bicycle waiting area, controlled junctions are often made up of multiple lanes, making them a challenge for new drivers. They often include filter lights, which can catch out learners who are unfamiliar with them.
Staggered junctions
Staggered junctions are best described being like a wonky or offset crossroads. They can be tricky for new drivers, so we’ll cover them separately.
Box junctions
Box junctions include a yellow box filled with crossed lines and are usually (but not always) controlled by traffic lights. No driver may enter the yellow box unless their exit is clear, this ensures that traffic keeps flowing.
Open, closed and blind junctions
The terms ‘open’, ‘closed’ and ‘blind’ can be applied to any junction. Open junctions give you a clear view of both directions as you approach. They’ll have a give way sign and – if the road is clear – you don’t have to stop to emerge from them, although you will need to slow down to an appropriate speed.
The view when approaching closed junctions is a bit more limited and you’ll be unable to see if the road is clear as you would be able to at an open junction. You’ll see a give way sign and road marking and you’ll have to stop to see if the way is clear before emerging.
As the name suggests, blind junctions give a severely restricted view of the road, even when pulled all the way up to the stop sign that you’ll see at all blind junctions. To emerge from a blind junction, you’ll need to creep your vehicle forward, inch-by-inch, to see if the way’s clear. If another road user is approaching, stop and wait for them to pass.
Signs you might see at junctions
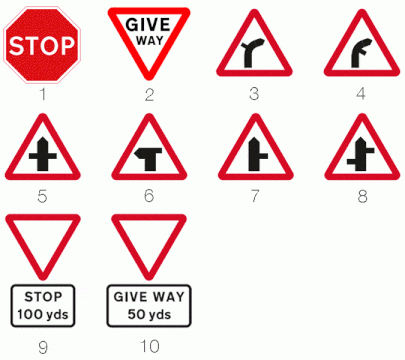
Stop – This one’s pretty clear. Stop.
Give way – Again, quite a clear one. If you spot a give way sign it’s usually a good warning that a junction is ahead.
Junction on bend – Junctions on bends often have poor visibility. Take extra care.
Junction on bend (reversed) – Same as above, but the junction is on the other side.
Crossroads – One of the many forms of junction.
T-junction – One of the more common forms of junctions. Signs like this make it easier for motorists to spot upcoming junctions. Don’t expect every T-junction to have a sign like this.
Side road – Warns of a side road coming up. Signs like this give you plenty of warning that a side road is coming up, allowing you to prepare thoroughly. Not all side roads have these signs.
Staggered junction – Lets road users know that a staggered junction is coming up.
Stop line 100 yards – Warns that there’s a stop line in 100 yards.
Give way 50 yards – Warns that you must give way in 50 yards.
How to turn left at a junction
If you’re already familiar with the MSPSL routine, this should be a piece of cake. If you need a refresher on what MSPSL is all about, check out our guide.
The first and most important thing to know about turning at a junction is that you should have spotted the junction quite a while before you actually arrive at it. Failing to notice that a junction is coming up and being forced to either brake sharply or allow your examiner step in with the dual controls is an embarrassing way to fail your driving test, you don’t want that. So, make sure that you’re always looking ahead for junctions.
Once you’ve spotted your junction, do the first step of the MSPSL routine: mirrors. You should be checking your interior mirror and then your left side mirror. If you don’t spot any hazards in your mirrors, start signalling left. The next step is road positioning, which catches out a lot of learners on their test days, so be extra careful.
If you’re driving on a road with a single lane each side, stay in the middle of your lane. If there’s room for two or more vehicles, make sure that you keep to the left but ensure that you don’t clip the curb.
Once you’ve got your positioning right, check that you’re travelling at an appropriate speed. This depends on what sort of junction you’re approaching, but you should be in 2nd gear and travelling under 15mph in most cases. Many drivers, both learners and experienced, approach junctions too fast, which doesn’t leave them enough time for the last step: looking.
When you’re getting close to the junction, you should be looking for potential hazards such as other road users or pedestrians using the junction to cross the road. Slowing down a little bit gives you plenty of time to do this. If the way is clear and safe, you may make your turn without stopping. If you’re unsure, stop.
After you’ve made your turn, make sure you check your interior mirror to ensure that nobody is speeding up behind you and don’t forget to cancel your turn signal is it’s still on.
How to turn right at a junction
The process for turning right is very similar to turning left, but with a few notable differences:
- You should position your vehicle towards the centre line of the road instead of over to the left.
- You should be travelling slower; no more than roughly 5mph in first gear.
- If the junction is closed, you’ll need to creep forward gently, so be sure to practise your clutch control.
- You’ll be crossing two lanes of traffic, so proper observation is even more important. If you’re unsure if you should pull out, consider if you’d have time to walk across the junction; if you could walk across it, you can drive across it.
Junctions in your driving test
Improper observation is one of the most common reasons to fail a driving test and nothing highlights the flaws in your observational skills like approaching a junction. Be extra-careful to use your MSPSL routine and make sure that you’re looking carefully for cyclists and other road users. Here are a few tips to help you out:
- Check your mirrors and start signalling good and early.
- Always give way to pedestrians crossing the road.
- When positioning yourself to turn left/right at a junction, make sure you don’t hit the curb (left turns) or stray over the centre line (right turns).
- Maintain a slow and steady speed.
- Stop just before the white line (if present). Don’t stop too early and don’t go over the line before you’re ready.
- Don’t pull out in front of another vehicle, forcing it to slow down sharply.
Image via Wikipedia